Here is something like deeply satisfying about a dish that combines simplicity with comfort, and that’s exactly what you get with this Recipe Fried Squash Recipe.
In case you’re reminiscing about summer dinners at Grandma’s table or looking for a quick, crispy snack, this recipe delivers best. With its golden crust and tender squash center, it’s a perfect side dish, appetizer, or even a finger food that will win over picky eaters and toddlers likely.
Which is the reason that’s makes this dish truly stand out is its ease of preparation. Using pantry staples like cornmeal, milk, and salt, paired with fresh squash, you’ll have a dish that’s both budget friendly and packed with flavor and Taste beautifully.
Moreover, the lack of heavy batter means less mess and a lighter, healthier finish.
Whether you are ready or not to bring a touch of old fashioned charm to your table? Come on to dive into the recipe that’s bound to become a staple in your kitchen perfectly.
The List of Ingredients: Fresh, Simple, and Substitutable
To make the perfect Fried Squash, you’ll need:
Main Ingredients
Fresh squash (yellow or zucchini) 2 medium sized squash, washed and sliced thin for even cooking.
Cornmeal : 1 cup, for a crisp, golden breading.
All purpose flour : ½ cup, to help the breading stick. For gluten-free, use almond or rice flour.
Salt : 1 teaspoon, or adjust to taste.
Pepper : ½ teaspoon for a subtle kick.
Sugar : 1 teaspoon, optional, to balance the flavors.
Baking powder : ½ teaspoon, for a lighter breading texture.
For Dipping Mixture
Milk : ½ cup; almond or oat milk works great for dairy-free options.
Egg : 1 large, beaten (omit for vegan and use flaxseed meal mixed with water instead).
For Frying
Oil : Grapeseed or coconut oil (1 cup), for a mild flavor and crisp finish. Avoid olive oil as it can burn at higher temperatures.
Optional Garnishes
Paprika or cayenne : A pinch for extra heat.
Chopped parsley : For a fresh, vibrant touch when serving.
Special Tip for Pro: You can use the freshest squash available for the best results. Look for firm, blemish-free squash with a bright & light color.
One-by-Step Instructions
Step 1: Prepare the Squash
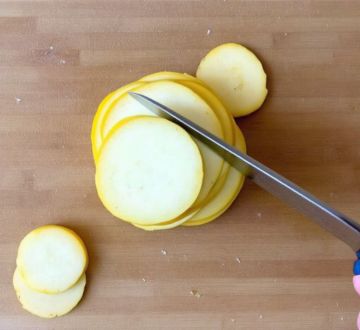
The condition of your demand you can start by washing your squash thoroughly under cool water to remove any dirt. By using a sharp knife, slice the squash into thin rounds about ¼ inch thick and well upholstered.
The thin slices cook evenly and develop the perfect crisp texture & embellishment.
Step 2: Set Up Your Breading Station
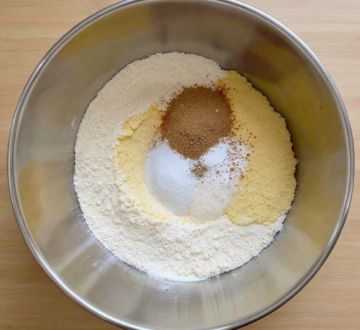
Into the shallow dish, mix together the cornmeal, flour, salt, pepper, sugar, and baking powder. This combination will ensure a flavorful, crispy coating with full of taste.
In a separate bowl, whisk together the milk and egg until being smooth and perfect.
Step 3: Coat the Squash
The Dipper each squash slice into the milk mixture, allowing the excess to drip off. Next, dredge the slice in the cornmeal mixture, pressing lightly to ensure an even coating.
You can place the breaded slices on a rack or plate in a single layer to avoid them sticking together with.
Step 4: Heat the Oil
Make sure about the point is heating oil, in a large skillet or frying pan, heat the oil over medium heat. The oil should reach about 350°F for optimal frying.
For testing, drop a pinch of bread into the oil and it should sizzle immediately without burning or flaming.
Step 5: Fry the Squash
Carefully place the squash slices into the hot oil, ensuring they don’t overlap. Fry in batches to maintain the oil temperature. Cook for 2/3 minutes per side, or until golden brown. Flip carefully using tongs or a spatula.
Step 6: Drain and Keep Warm
With the condition of removing the fried squash from the oil and place it on a rack lined with paper towels to drain excess oil. If preparing large batches, keep the fried squash warm in an oven set to 200°F until ready for serving or plating amazingly.
Exceptional Cooking Tips and Tricks
Slice Thin for Crispiness: The thinner the squash slices, the crispier the result. Aim for uniform thickness for even cooking.
To Handle the Sticky Sap: The Fresh squash can release a sticky sap when sliced. Pat the slices dry with a paper towel before breading to ensure the coating sticks fully.
To Avoid Overcrowding: By Frying in small batches helps maintain consistent oil temperature, resulting in evenly crispy Huddle or squash.
For using the Right Oil: Grapeseed and coconut oil are excellent selections for frying due to their high smoke points and neutral flavors and tastes aesthetically.
Keep Resting the Breading: Please Let the breaded squash rest for about 15 minutes before frying to help the coating adhere much better.
Serving Suggestions & Variations
Pairings for Perfection
As a Snack or Appetizer: If you want you can serve the fried squash with a side of tangy ranch dressing or spicy aioli as your demand.
As a Side Dish: You can Pair with Southern favorites like fried chicken, collard greens, or cornbread.
As a Main Course: Please add a side salad and roasted potatoes for a healthy balanced meal and food.
Creative Twists
Herbed Squash: By Mixing dried basil, oregano, or thyme into the breading for an Ambrosial touch.
Cheesy Upgrade: By Sprinkling Parmesan cheese over the squash slices immediately after frying for a savory addition.
Vegan Option: You can use almond milk and a flaxseed-water mixture in place of milk and egg for vegan friendly fried huddle.
Baked Squash: That is for a lighter version, bake the breaded squash slices on a greased baking sheet at 400°F for 20 minutes, flipping halfway.
Storage & Meal Prep Tips
Storing Leftovers
However, the fried squash is best served fresh and hot, you can store leftovers in an airtight container in the refrigerator for up to 2 days. By reheating in the oven at 375°F to restore crispiness perfectly.
Please avoid microwaving as it will make the squash soggy.
Meal Prep Made Easy
To save time, you can slice the squash and prepare the bread mixture ahead of time. Store them separately in the fridge, then bread and fry when ready to serve.
FAQ
Can I use other types of squash for this recipe?
Yes, Of course you can! Zucchini and patty pan squash work beautifully in this recipe together with.
How it possible to prevent the bread from falling off?
By ensuring the squash slices are dry before breading and let them rest for 15 minutes after breading to help the coating stick perfectly.
Why deep frying is necessary, or can I shallow fry?
Shallow frying works just as well. Please ensure the oil is deep enough to cover at least half of the squash slice fully.
Is it possible to make this gluten free?
Yes! By substituting the all-purpose flour with almond or rice flour. Ensure the cornmeal you use is labeled gluten free Completely!
May I freeze fried squash?
That’s not recommended as the texture becomes soggy when thawed and reheated completely.
Final Thoughts
The best and simple recipe Fried Squash Recipe is as simple as, yet satisfying way to enjoy fresh produce. And also Its crispy texture, versatility, and nostalgic charm make it a dish you’ll want to revisit time again and again.
In case you’re whipping up a quick snack or serving a crowd, fried squash is a guaranteed crowd pleaser and best option.
Please Don’t keep this golden delight to yourself only, share your results in the comments, post your creations on social media, and explore more comforting recipes on our blog and idea!
Stay tuned for more homemade classics, like apple butter and other Southern favorites. Happy cooking!